MP3 Jukebox
About
Current Progress
Construction
Software
Photos
|
 |
|
| |
|
Construction Begins
So, with the aim of creating an MP3 jukebox based on an Amiga and a MAS player for as little as possible, I set off in search of parts. For the case I used the shell of an ancient Pioneer CD player which my brother had given me. The player itself had never been great, and had long since been retired. So I gutted it. I decided to use an Amiga 1200 for the heart of the system, mainly because I had one lying around, but also because the 1D4 motherboard was just about short enough to fit inside my case, and this was a lot more useful a computer than the smaller Amiga 600 which originally came to mind. For a start its processor (the Motorola 68020), while still puny by today's standards, is far more powerful than the 600's 68000. Added to this the AGA chipset allowing 24-bit colour directly output to a TV, and 2MB of memory instead of the 600's 1MB, there was no competition. And if the standard spec turned out to be too little to run the system efectively, the 1200 has far more options for expansion.
Mounting the motherboard was quite tight - so tight in fact that I needed to cut small grooves inside each side of the case to allow the board to slot in. This proved to be a nice secure way of mounting it, and also allowed access at the side to the PCMCIA slot, which I planned to use for networking or mass storage for the transfer of files. With the CD player totally gutted, I enlarged the slot for the CD tray in the front and mounted a standard 5.25" CD drive with a black fascia in its place. Not the prettiest of solutions, but cheap and easy!
|

|
|
 |
|
| |
|
The Nitty Gritty
Well, for several years this project spent most of its time under my bed, being taken out the odd rainy day for a few hours work before going back to gathering dust. But in the past year or so I finally found some motivation and started making a lot of progress with it. For a long time the main work was on AmiTunes, the software at the heart of the player. That took quite some time (and still isn't finished!) since it developed into more of an everyday music player application, and of course grew extra features to match. Once that was working reasonably well with the MAS player however, the hardware could be built. I started using my desktop A1200 as a testbed, with the MAS Player hanging off the back. That worked, so next was the LCD. A CrystalFontz 16x2 character serial display was chosen, as its dimensions almost exactly matched those of the original display in the CD player's carcass. These LCD modules are wonderfully versatile, with built-in horizontal scrolling, custom character and custom bootscreen memories, and so on. And development could be done on my AmigaOne, so that went a lot faster than working on the A1200!
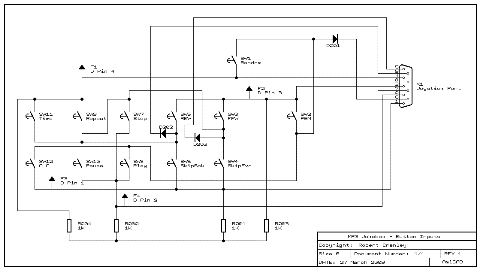
The front panel of the CD player contained buttons which I wanted to use to control AmiTunes, so a quick look with a multimeter, a pen and paper gave me the circuit diagram: a matrix of 3x4. So, after adding some pull-up resistors and testing the circuit, I added support for the buttons to AmiTunes. By strobing three of the pins of the joystick in turn I could activate each column, and then use the 4 remaining pins to read in the row. So I could read all 12 buttons using just the joystick port, and now I have the whole front panel working - even though it was still just hanging off the back of my A1200...
 Front Panel Buttons Schematic Front Panel Buttons SchematicWith the modified original front panel PCB back in its place, I insulated the new display's PCB with some plastic sheet and trimmed the edge of the case behind the bezel to be a snug fit. Between the front of the case and the button PCB behind, it was held nice and securely in the right position. Didn't even need any hot glue! Wires from the LCD (serial in, +5V and ground) were routed back to a small adaptor board which routed all the signals required to and from the serial and joystick ports, the LCD and front panel buttons, and power required by all the front panel parts. Space has also been left for serial into the Amiga, as I plan to add a PIC-based IR remote receiver at a later date.
|

|
|
 |
|
| |
|
IR Remote Receiver
With the front panel LCD module and buttons working well and fitting together nicely, I set about adding the finishing touches to the front of the jukebox. First, the Amiga's power and hard drive activity LEDs needed to be displayed, so I put together a small board with an LED for power (yellowy-green to match the LCD module), one for hard drive activity (blue because it looks nice and I had one lying around), and the relevant resistors. This was mounted on the back of a small piece of black plastic which slotted neatly into a space left by the original front panel power switch. All worked fine, so I started on the final part: the IR remote receiver.
My intention for the IR remote receiver was to use some sort of autonomous decoder module so that the Amiga didn't have to do the decoding in software. I soon found a ready-made module that consisted of a PIC chip and receiver, and which decoded standard Philips-style commands into serial strings. Sounded perfect! I fitted it just below the power and activity LEDs and glued a little piece of transparent red plastic over the remaining opening to finish the look. This looked quite well, and more importantly, once I configured the module with terminal software, it worked automatically, sending serial strings without handshaking that I could receive on the serial port while simultaneously outputting data for the LCD module.
The first problem I found however, was that the IR receiver module sent TTL-style serial (mark = +5V, space = 0V) instead of RS-232 style serial (mark = -3 to -15V, space = +3 to +15V (ish)) that a standard serial port like the Amiga's accepts. To solve this, normally a translation IC like a MAX232 is used. However, since this was a low-speed, one-way translation without handshaking, I decided to try using a standard transistor as a simple NOT gate to invert the signal and pull it up to +12V where necessary. This gave levels of roughly mark = 0V and space = +12V, which are outside the RS-232 specification for 1, but luckily the Amiga is happy to accept those levels reliably!
This was up and running well for some time while I added serial decoding capability to the AmiTunes software, but I later came across another problem. As well as for playing MP3s, I also used the jukebox for playing WHDLoad games. Most of these still worked fine, but Sensible World of Soccer seemed to occasionally crash for some unknown reason. I knew it was a problem specific to the jukebox's hardware since putting the hard drive in another Amiga showed no issues, and I eventually twigged that the crashes mostly happened when someone used an IR remote in the room. It turns out that interrupts were being generated by the serial port which games weren't handling, and these eventually brought the game crashing back to the Workbench screen. Finally knowing what had caused this issue, I had to figure out some way of stopping it from happening. Since the IR decoder module was fully autonomous, the simplest way to stop it from sending serial data was to just disconnect it. That wasn't very practical though, so I decided to control the +5V power it required by software instead. To do this, I simply put another transistor on my little adaptor board that turned on and off the +5V supply to the module. I used the DTR line (which was free since I didn't use any handshaking) to turn on the transistor via appropriate resistors and diodes, with the result that the module stayed powered down until something brought up the DTR line. A simple Shell command I wrote pokes the appropriate values into the register to turn it on and off, and so the module's power is turned on in jukebox mode, and left off in normal OS / WHDLoad mode.
|

|
|
|


